Starting out in Astronomy - Introduction
After much deliberation, about eighteen months ago I bought my first serious telescope. I have always had a fascination with the skies above and the universe at large, but had never made the time to work out exactly what I needed to 'do it properly'.
There's nothing quite like the first time that you see Saturn through the eyepiece! The thought that light from the sun has streamed out to Saturn, bounced off, and then landed on your own eye is amazing!
.") |
| Saturn - the result of stacked frames from a video using my Olympus camera and RC8 telescope (about 291x magnification). |
After marvelling at seeing the Orion nebula visually, to then see a longer exposure of it appear on my attached camera screen showing colour and even more of its vast clouds started me down the path of wanting to explore astrophotography and see the ordinarily invisible wonders of the night sky.
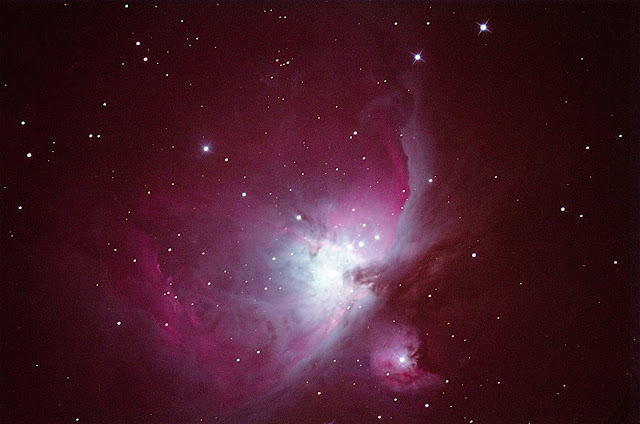 |
| Orion Nebula (M42) - 60 second exposure, processed to counter 'light pollution'. |
I have spent a lot of time researching online and reading numerous forum posts, attempting to piece together the puzzle that would show me exactly what I needed. More specifically, I was hoping to buy a telescope that would be versatile, that I could use for anything.
The truth is, there is really no such thing, although you can get close if you accept that there will always be compromises. That said, I believe I've purchased equipment that has suited me well as I've progressed over the past eighteen months. I now have a few telescopes which are used for different purposes.
In this series of blog posts, I'll attempt to distill what I've learned both through research and through spending long hours under the night sky fumbling around with my astronomy gear.
This first post will summarise the key topics that I'll explain in more detail, and with more focus in following posts. Often I have found statements online such as "Dobsonian mounted Newtonian telescopes can't be used for astrophotography". Generally these kind of statements don't address all of your questions as a newcomer to astronomy. Through trying things out, I answered for myself the practical reasons why I would make the same recommendation. (Note however, that you can image some things with a Dobsonian mounted Newtonian, depending on how you are set up)
Start Simple
Even after having spent time with telescopes, a recent trip to a dark site (far from the city, where I live) renewed my appreciation of just looking up at the sky and seeing the Milky Way in all its glory - no telescopes required!
Many people will suggest starting with a pair of binoculars, which is not a bad suggestion. With a pair of 50mm 10x binoculars, you can see so many more stars than with the naked eye. The Orion Nebula will also start to take form as a gaseous smudge rather than just a bright star. Also, they're very easy to pick up and point anywhere which is great for learning your way around the night sky!
Visual Observing
"But ha! A telescope sounds so much better than binoculars", you say. Well, yes you will be able to see much more with telescopes by magnifying smaller objects, although you'll view less area of the sky at a time. Also, you'll be able to attach cameras more easily, although setting up a telescope and cameras takes much more time. Again, all optical instruments serve a purpose because no one instrument can do everything well.
For longer focal length telescopes, a Dobsonian mounted Newtonian is a popular choice for visual observing. They are easy to aim and the larger apertures collect a lot of light. I would say that 8 inches aperture and above can provide good views of the brighter nebulae and globular clusters. I started with a Skywatcher 12 inch GoTo Dobsonian because I did have 'aperture fever'. It provides great views, but the telescope plus base are a total of 43kg and it doesn't easily fit in my current car! It should be noted that Newtonian telescopes require mirror collimation, almost every time that you move them around. This is to align the two mirrors, which isn't a big deal once you're practiced at it, but is an additional setup step to consider. A ten inch Dob Newtonian is probably a good compromise of size/portability and aperture. That said, I found the views through my 8 inch RC8 at a dark site not too far off the 12 inch, despite being a design that people don't typically use for visual observing.
Others prefer to start with a short focal length refractor. All you need to do it put them on some form of tripod mount and they're ready to use! Generally better for wider field viewing, but a quality refractor telescope and suitable choice of eyepieces can make them quite versatile. The limitation being aperture, as refractors become very expensive at larger apertures.
If I was starting again, I'd probably start with a (maybe collapsible for greater portability) 10 inch Dobsonian Newtonian for visual observing. It would provide a large aperture and be much easier than the 12 inch equivalent to wrangle, although an 8 inch would definitely be more portable again and consequently a better choice. I wouldn't bother with electronics for visual observing, because I would know I'd eventually get a different scope and sophisticated mount for astrophotography.
In an ideal world, you should attend a star party to get an idea of what you'll see with your eye through different telescopes. If you find that you get more of a kick out of imaging colourful nebulae than viewing faint grey smudges of nebulae, you won't want to over invest in a telescope and mount that isn't ideal for photography. Better to save some cash which will easily be spent on astrophotography gear.
The saying that "the best scope that you have is the one that you use the most" is certainly true.
Astrophotography
My First Setup
Initially, I just stuck my camera onto my Dobsonian mounted Newtonian using a t-mount to see what I could see. For bright targets such as the moon, you don't need any any tracking as the photo exposure will be short.
My mount had tracking, so I could manage several seconds of exposure at focal length 1500mm (3000mm at 35mm frame equivalent) if everything went well. The problem is that the tracking wasn't designed for astrophotography, so:
1. It jumps around a bit to keep the target in viewAlt-Az mount - not good for exposures of more than a few seconds.
2. It doesn't address rotation around the poles (it isn't level with the equator) and so your target won't just move around in the view, it will also rotate because its movement will be an arc.
Also, as previously mentioned, such a big scope wobbles a lot - which prevents any real length of exposure.
What You Really Need
Many people start astrophotography with an SCT telescope on a mount that can be equatorially aligned. I don't have experience with these, but I've seen many great images produced. Myself, I use an RC8 (8 inch Ritchie Chretien design), which is a design typically used for imaging. Since GSO has started producing them, these are much more affordable now. Before buying one, I had trouble finding anyone who used them visually to comment on the quality when not imaging. I've found the views to be satisfactory and was really impressed when I took it to a dark site recently. I'd be happy to use it for visual observing rather than lug my 12 inch Dob around! The reality is, however, that my camera will generally be attached to this scope.
You need an equatorial mount that can handle the weight of your scope and camera. The general rule of thumb is to go no more than 2/3 of the stated maximum load for the mount. The reason being that a more solid mount is needed to prevent wobbling and movement due to a heavy telescope and camera and for the motors to be able to handle the load.
Then there's the camera, related gear, and image stacking and processing software which I'll discuss in a following post. The biggest thing to keep in mind is that 'light pollution' near cities means that long exposures will require heavy processing to separate the target from the general sky glow. This results in much noisier images. I live close to the Melbourne CBD and a 60 second exposure at 1600mm focal length produces a background that is definitely not black. Orion Nebula doesn't fare too badly, but fainter galaxies etc. are hopeless where I live.
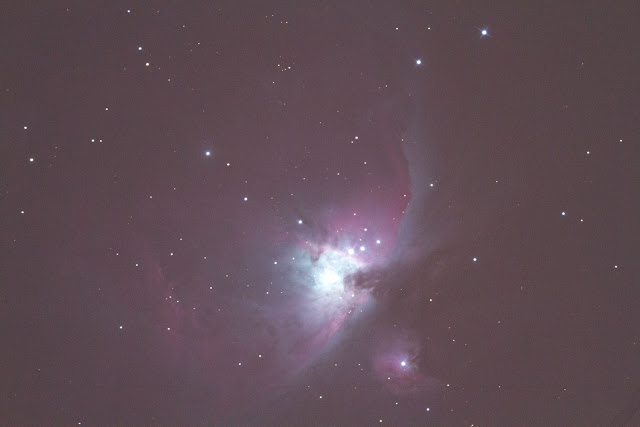
Below is one of the unprocessed output images from the camera that I used to produce the final Orion Nebula image near the top of this post (after processing, stacking and then tweaking the levels). The result does look pretty good, but it wouldn't win any awards. If you look closely at the final image above, it is quite grainy due to the processing to separate the background and the nebula better.
 |
| Unprocessed image with light pollution (60 sec exposure). |
Here's a comparison with Centaurus A, a galaxy that isn't much brighter than the sky glow where I live. Consequently, even after heavy processing, there's barely anything there. I'm looking forward to my next dark site outing to capture some galaxies! Note, this was taken with my little short tube 80 refractor. The results may be a little better with the RC8 under these same conditions (maybe).
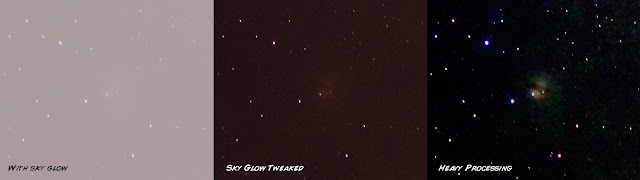 |
| Light pollution and heavy processing required to separate the subject from the background - with unsatisfactory results. |
Disclaimer: I haven't owned or tried other telescope designs such as SCTs, so this based on my direct experience only.
A quick brain dump of some things that it's useful to know (and accept) when starting out:
- The requirements for visual astronomy are different to those for astrophotography.
- There are a number of different telescope designs, some more suited to certain uses than others, so ideally you'd have some idea of what you'd like to spend most of your time on. This will likely change over time!
- There are two main mount types. Alt-azimuth mounts are easy to orient for visual observing. Equatorial mounts are essential for long exposure photography through telescopes and they require more time to setup and align properly than a simple Dobsonian mount.
- When your local astronomical society has an event that is open to the public (or else you join), go along to check out other people's equipment and get a feel for what to expect with different types of gear. Astronomers like to share knowledge and tips!
- The turbulence of the atmosphere limits the quality of viewing an object at high magnification.
- The turbulence of the atmosphere makes it reasonably impossible to capture a detailed image of a planet with a single exposure photograph.
- The higher the magnification, the dimmer an object will appear, resulting in less contrast/detail of the view.
- The higher the magnification, the quicker an object will move out of the field of view (if you don't have a tracking mount) due to the rotation of the Earth.
- The higher the magnification, the harder it is to find your way around the sky because you're viewing a smaller portion of the sky. You'll generally start with a lower magnification eyepiece to navigate to the right location, then switch to the higher magnification eyepiece which may require some hunting around to get the small object (planet, for example) into the view.
- 'Light pollution' of urban environments limits your ability to view and photograph some faint objects such as nebulae and galaxies. The sky glow can be brighter than the objects themselves.
- Heavy and long telescopes will wobble when you touch them and when there's a breeze. When viewing at low magnifications this isn't a problem. At high magnifications (for example, when viewing a planet), you're viewing such a small portion of the sky that even the smallest telescope movement will noticeably jiggle the target in the view. For astrophotography, this is a showstopper.
- The moon is super-bright. Use a 'moon filter' to reduce the brightness for visual observing. It will be more comfortable and you'll see more detail.
- If you're interested in astrophotography, learn to use the manual controls of a camera (DSLR, for example) with a telephoto lens first. Using a telescope instead of a regular lens multiplies the degree to which everything must be perfectly setup. Target the moon and interesting sections of the Milky Way. My first attempts were handheld shooting of the moon with a 150mm lens (quickly followed by use of a tripod).
- To image objects that require a long exposure (greater than a few seconds), you'll need an equatorial mount. Typically, anything other than the moon, short exposures and video clips of planets, and regular sky views with a wide angle camera lens.
- Equatorial mounts are a pain to setup and polar align in order to capture exposures of beyond 30 seconds without creating star trails (and consequently 'smudging' whatever your target is).
- Collapsible Newtonian telescopes are more portable, but generally require collimation every time you move them.
- A Dobsonian mounted Newtonian without electronics for GoTo and tracking is probably the best value option for being able to view a wide variety of objects visually.
- GoTo mounts are pretty handy, especially in the city where light pollution makes it harder to navigate visually. That said, if you can't get your mount aligned correctly, then GoTo won't go to where you're hoping it will.
- Tracking is nice to have when you're operating at high magnification, even if you're not imaging. It's not essential for visual observation, but it's good to not lose a planet out of the field of view if you look away for a few seconds.
- Wide aperture telescopes (12 inch Newtonian, for example), provide impressive views of fainter objects, but are big and heavy and therefore less portable and more of a hassle to use.
- You don't need a large aperture for astrophotography, because you rely on longer exposures in order to collect more light. However, a larger aperture will require a shorter exposure and therefore less accurate tracking. If you need a long focal length telescope, some of those designs (SCTs and RCs) naturally have a larger aperture with the longer focal lengths.
- There's no substitute for a dark sky if you want to capture quality long exposure images of deep sky objects. You can get some reasonable, although grainy results by heavily processing long exposures in skies with high light pollution.
- There are desktop and mobile 'sky atlas' applications that can help to locate objects and also work out the size of objects in the view of various telescope and eyepiece combinations. I use Starmap Pro and Starmap HD regularly.
- astrobin.com is a good site for viewing user uploaded astro images. You can search for specific astronomical targets and see which equipment was used to capture them along with exposure details. Keep in mind that there are people out there with expensive gear getting some impressive results, but also amateurs with modest equipment who have also honed the techniques allowing them to produce great work.
Other Posts in this Series
More posts to follow soon...
- My gear - pros and cons.
- A good all-rounder setup.
- General observing.
- The moon.
- Nebulae.
- Urban astronomy.
- Astrophotography.
- Star parties.


